You've seen the AI-generated portraits, profile pictures, and themed avatars all over your feed — and now you want one that actually looks like you. The good news: putting yourself into an AI image generator is straightforward once you know which tool to reach for and how to prep your photo. This guide walks through exactly how to do it, step by step.
What "incorporating yourself" actually means
When people search for how to incorporate yourself in an AI image generator, they almost always mean one of three things:
- Use your face as a reference so the AI generates a new image that looks like you in a different style, outfit, or scene.
- Restyle an existing photo of yourself — turn a selfie into an oil painting, anime portrait, cyberpunk avatar, or LinkedIn-ready headshot.
- Build a consistent character based on you that you can reuse across multiple images (storybook illustrations, comics, game avatars).
All three rely on the same basic mechanic: you upload a clear reference photo, and the AI uses it as a guide while generating. You don't need to train your own model anymore — modern image generators can pick up identity from a single good reference.
The 3 ways to put yourself into an AI image generator
1. Photo-to-portrait (the easiest path)
You upload a selfie or headshot and the generator transforms it into a styled version of you. This is the fastest approach and produces the most reliable likeness because the AI is editing your actual photo rather than imagining your face from scratch. Use this when you want artistic portraits, stylized profile pictures, or themed avatars.
2. Photo-as-reference (most flexible)
You upload a reference image and write a prompt describing a completely new scene. The AI keeps your face but places you in any setting you describe — an astronaut on Mars, a renaissance painting, a fantasy warrior. Use this when you want full creative freedom over the scene while staying recognizable.
3. Character lock (best for series)
If you need multiple images that all look like the same person — say, a children's book starring you, or a comic series — use a generator that supports character consistency. You upload one reference, then generate multiple scenes that all preserve the same likeness.
Which AI image model should you use?
Not every image model handles likeness equally well. Here's a quick comparison of the strongest options on Generor for putting yourself into AI images. All five accept a reference photo of you as input.
AI image models compared for putting yourself in the picture
| Model | Best for | Multi-photo reference | Tier | Cost per image |
|---|---|---|---|---|
| Nano Banana Pro | Premium likeness, 4K detail, complex scenes | Yes | Top | $0.134 |
| GPT Image 1.5 | Strong instruction following + identity | Yes | Top | $0.06 |
| Nano Banana 2 | Fast, high-quality everyday use | Yes | Mid | $0.067 |
| Seedream 4.5 | Multi-reference, sequential consistency | Yes | Mid | $0.04 |
| Flux 2 Dev | Cheap iteration with reference support | Yes | Budget | $0.014 |
Quick recommendation: start with Nano Banana 2 for everyday avatars and stylized portraits — it hits a sweet spot of quality and speed. Step up to Nano Banana Pro or GPT Image 1.5 when you need maximum fidelity (a hero image, a printed product, a professional headshot). Drop down to Flux 2 Dev when you want to iterate cheaply through dozens of variations.
Step-by-step: how to put yourself in an AI image generator on Generor
Step 1 — Pick the right generator
Generor has two purpose-built tools for this:
- PFP Generator — best for profile pictures, stylized avatars, and gaming/social use. Upload your headshot, describe the look you want, and it produces a polished avatar.
- Portrait Generator — best for artistic portraits in styles like oil painting, watercolor, anime, pop art, and renaissance. Same upload flow, but optimized for fine-art output.
For broader creative scenes (you in any setting), use the AI Image Generator with a reference image attached.
Step 2 — Prepare your reference photo
This is the single biggest factor in how well your AI image turns out.
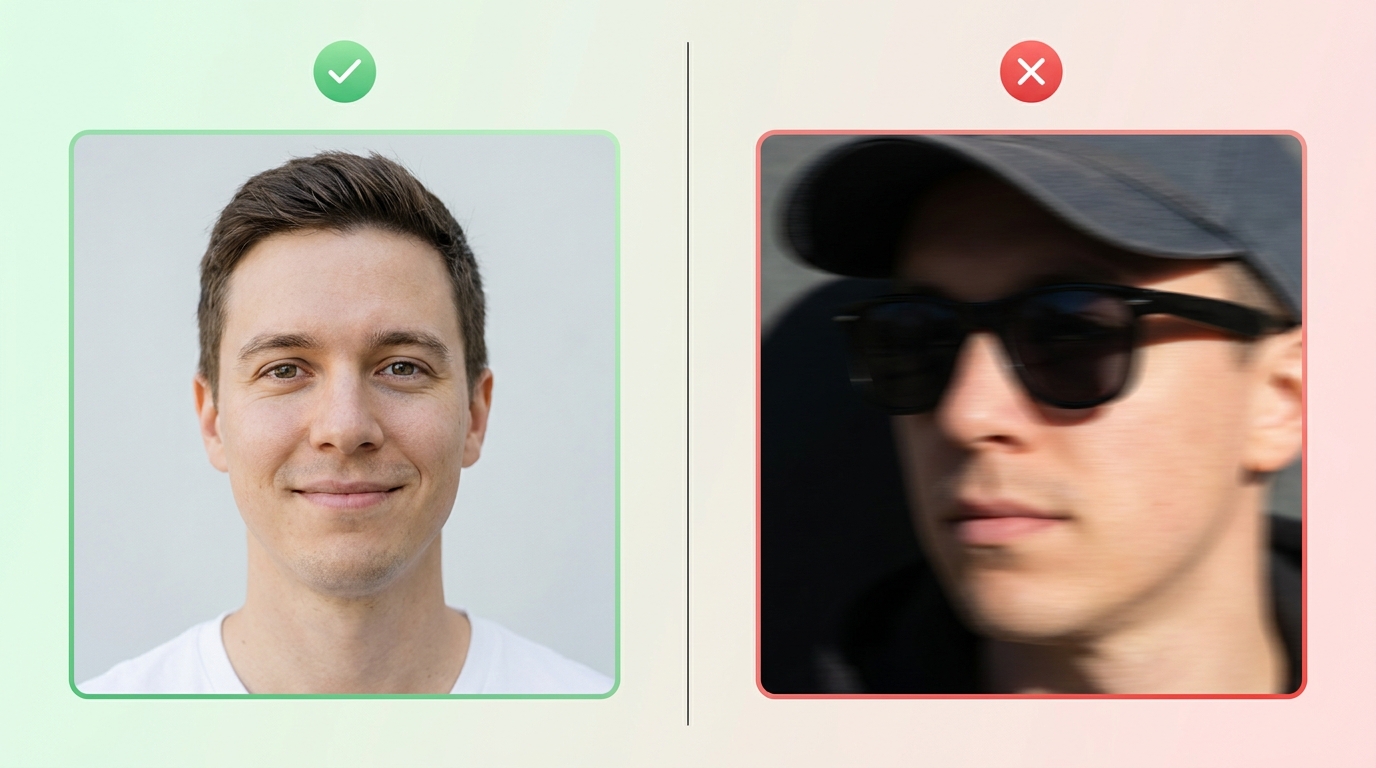
A good reference photo should be:
- Sharp and well-lit — natural daylight is ideal. Avoid heavy shadows across the face.
- Front-facing — your face roughly centered, both eyes visible, no extreme angles.
- Unobstructed — no sunglasses, hats pulled low, or hands on your face.
- High-resolution — at least 512×512 pixels of actual face. A small face inside a large landscape photo gives the AI very little to work with.
If you have one really good headshot, use it. If you have several, pick the one with the most neutral expression and even lighting.
Step 3 — Upload it
Open the generator, click the photo upload field, and select your reference. You'll see a preview of what the AI is going to use as its identity guide.
Step 4 — Write a clear prompt
Describe what you want the output to be. Keep it focused — three to five concrete details beat a long paragraph. Some examples:
- "Professional headshot, navy suit, soft studio lighting, neutral grey background, photorealistic"
- "Oil painting in the style of John Singer Sargent, warm colors, classical pose"
- "Anime character portrait, vibrant colors, dynamic lighting, manga style"
- "Cyberpunk warrior, neon city background, leather jacket, cinematic"
Step 5 — Generate, review, iterate
Hit generate and review the result. If the likeness is off, try one of these adjustments:
- Swap the reference photo for a clearer or more front-facing one.
- Reduce conflicting prompt details (don't ask for "long flowing hair" if your reference shows short hair — the AI will compromise on identity).
- Generate two or three variations and pick the closest one.
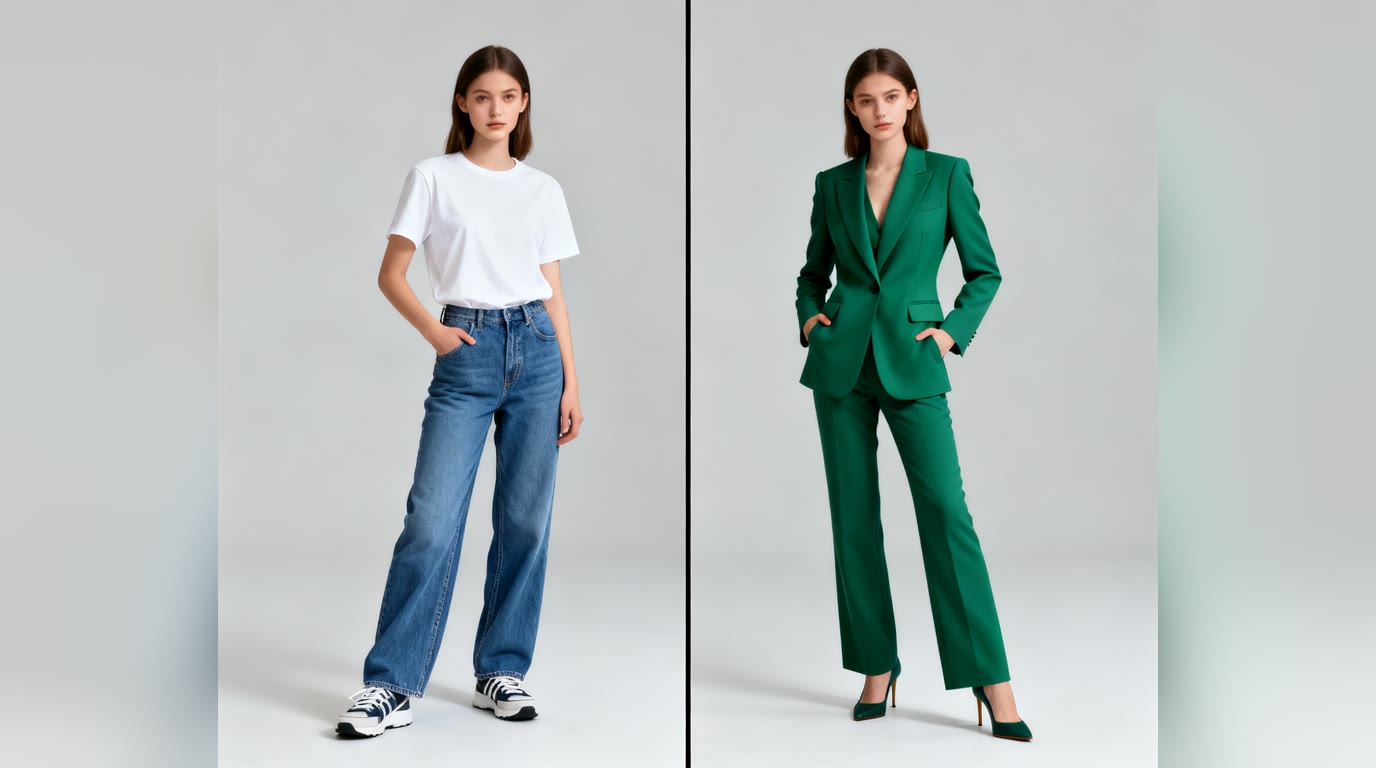
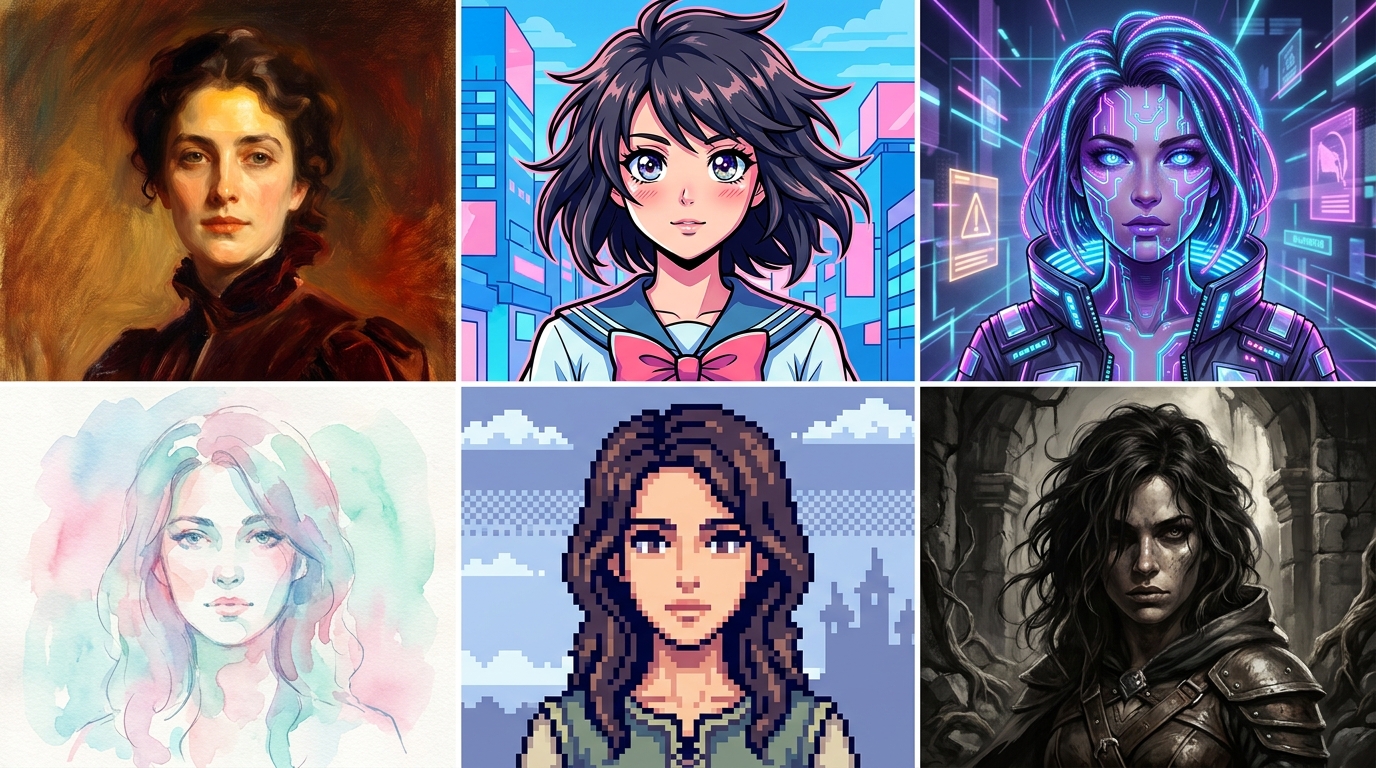
One photo, infinite styles
This is what makes the whole workflow worth it. Once you have a good reference photo dialed in, you can re-run it through any style you can describe — from classical oil painting to retro pixel art to dark fantasy. Same person, completely different worlds:
Tips for getting a recognizable likeness
- Start neutral, then stylize. Generate a clean, photorealistic version of yourself first. Once you confirm the AI has captured your likeness, push into stylized territory (paint, anime, fantasy) on the next pass.
- Don't over-prompt the face. Avoid describing your own facial features in the prompt — the reference photo handles that. Describing eye color, jawline, or hairstyle in text can fight with the photo and weaken the resemblance.
- Match camera framing to your reference. If your photo is a tight headshot, ask for a "headshot" or "portrait" — not a full-body action shot. Big framing changes force the AI to invent body details.
- Generate multiple variations. Even a great reference produces some variance. Generating three to four images and picking the best is faster than tweaking the prompt repeatedly.
- Use higher resolution for finals. Generate a low-cost preview first, then re-run at higher quality once you've locked in the look.
A note on consent and privacy
Only upload photos of yourself or people who have given clear permission. AI-generated likenesses of others without consent can range from awkward to actively harmful, and several jurisdictions now have specific laws around it. If you're making images for commercial use — book covers, marketing, merchandise — keep written permission on file for any face that appears.
Frequently asked questions
Do I need to train an AI model on my photos?
No. A few years ago you'd have needed to train a custom LoRA or DreamBooth model on 20+ photos. Modern image generators can produce a strong likeness from a single reference photo, with no training step required.
How many photos do I need?
One good photo is enough for most generators. If a tool offers multi-photo reference, two or three from slightly different angles can improve consistency — but quality beats quantity every time.
Why doesn't it look like me?
Almost always one of three things: the reference photo is low quality (blurry, dim, or angled), the prompt is fighting the photo (you're describing different features in text), or the model you're using doesn't have a strong identity-preservation feature. Try a sharper photo, simplify the prompt, and pick a generator built for likeness — like the PFP or Portrait generators on Generor.
Is this safe to use for my LinkedIn or professional profile?
Yes — AI-generated headshots from your own reference are a common professional use case, and many people now use them in place of studio photos. Just disclose it if your context calls for authenticity (dating profiles, journalism, identity verification).
Ready to try it?
Pick the tool that matches what you want:
- For avatars and profile pictures → PFP Generator
- For artistic portraits → Portrait Generator
- For full creative scenes → AI Image Generator
Upload one good photo, write a focused prompt, and you'll have an AI image of yourself in under a minute.